S’mores Cupcakes

IMG_2993

Being that it’s Diversity & Inclusion week at work one of the events that we organized was a Cultural Pot Luck. I have to say, I love pot lucks – it’s really up there with my passion for buffets. Not sure what it is but walking into a room with tables and tables lined with foods to pick and nosh from just makes me so happy! I’d almost say it makes me giddy. Yes, I’m that girl.

IMG_3011

The idea of the pot luck is for everyone to bring a dish that represents their cultural origin and it was a great way to get everyone talking to each other and food truly is the ultimate ice-breaker! I only needed to think back to my childhood days and for some reason the first thing that came to mind was my grade 7 camping trip to Anvil Island in Vancouver. I remember we had a night telling ghost stories with our camp counsellors and huddled together making s’mores. S’mores – truly goes to show that the best things in life are the simple ones!

IMG_2990

IMG_2987

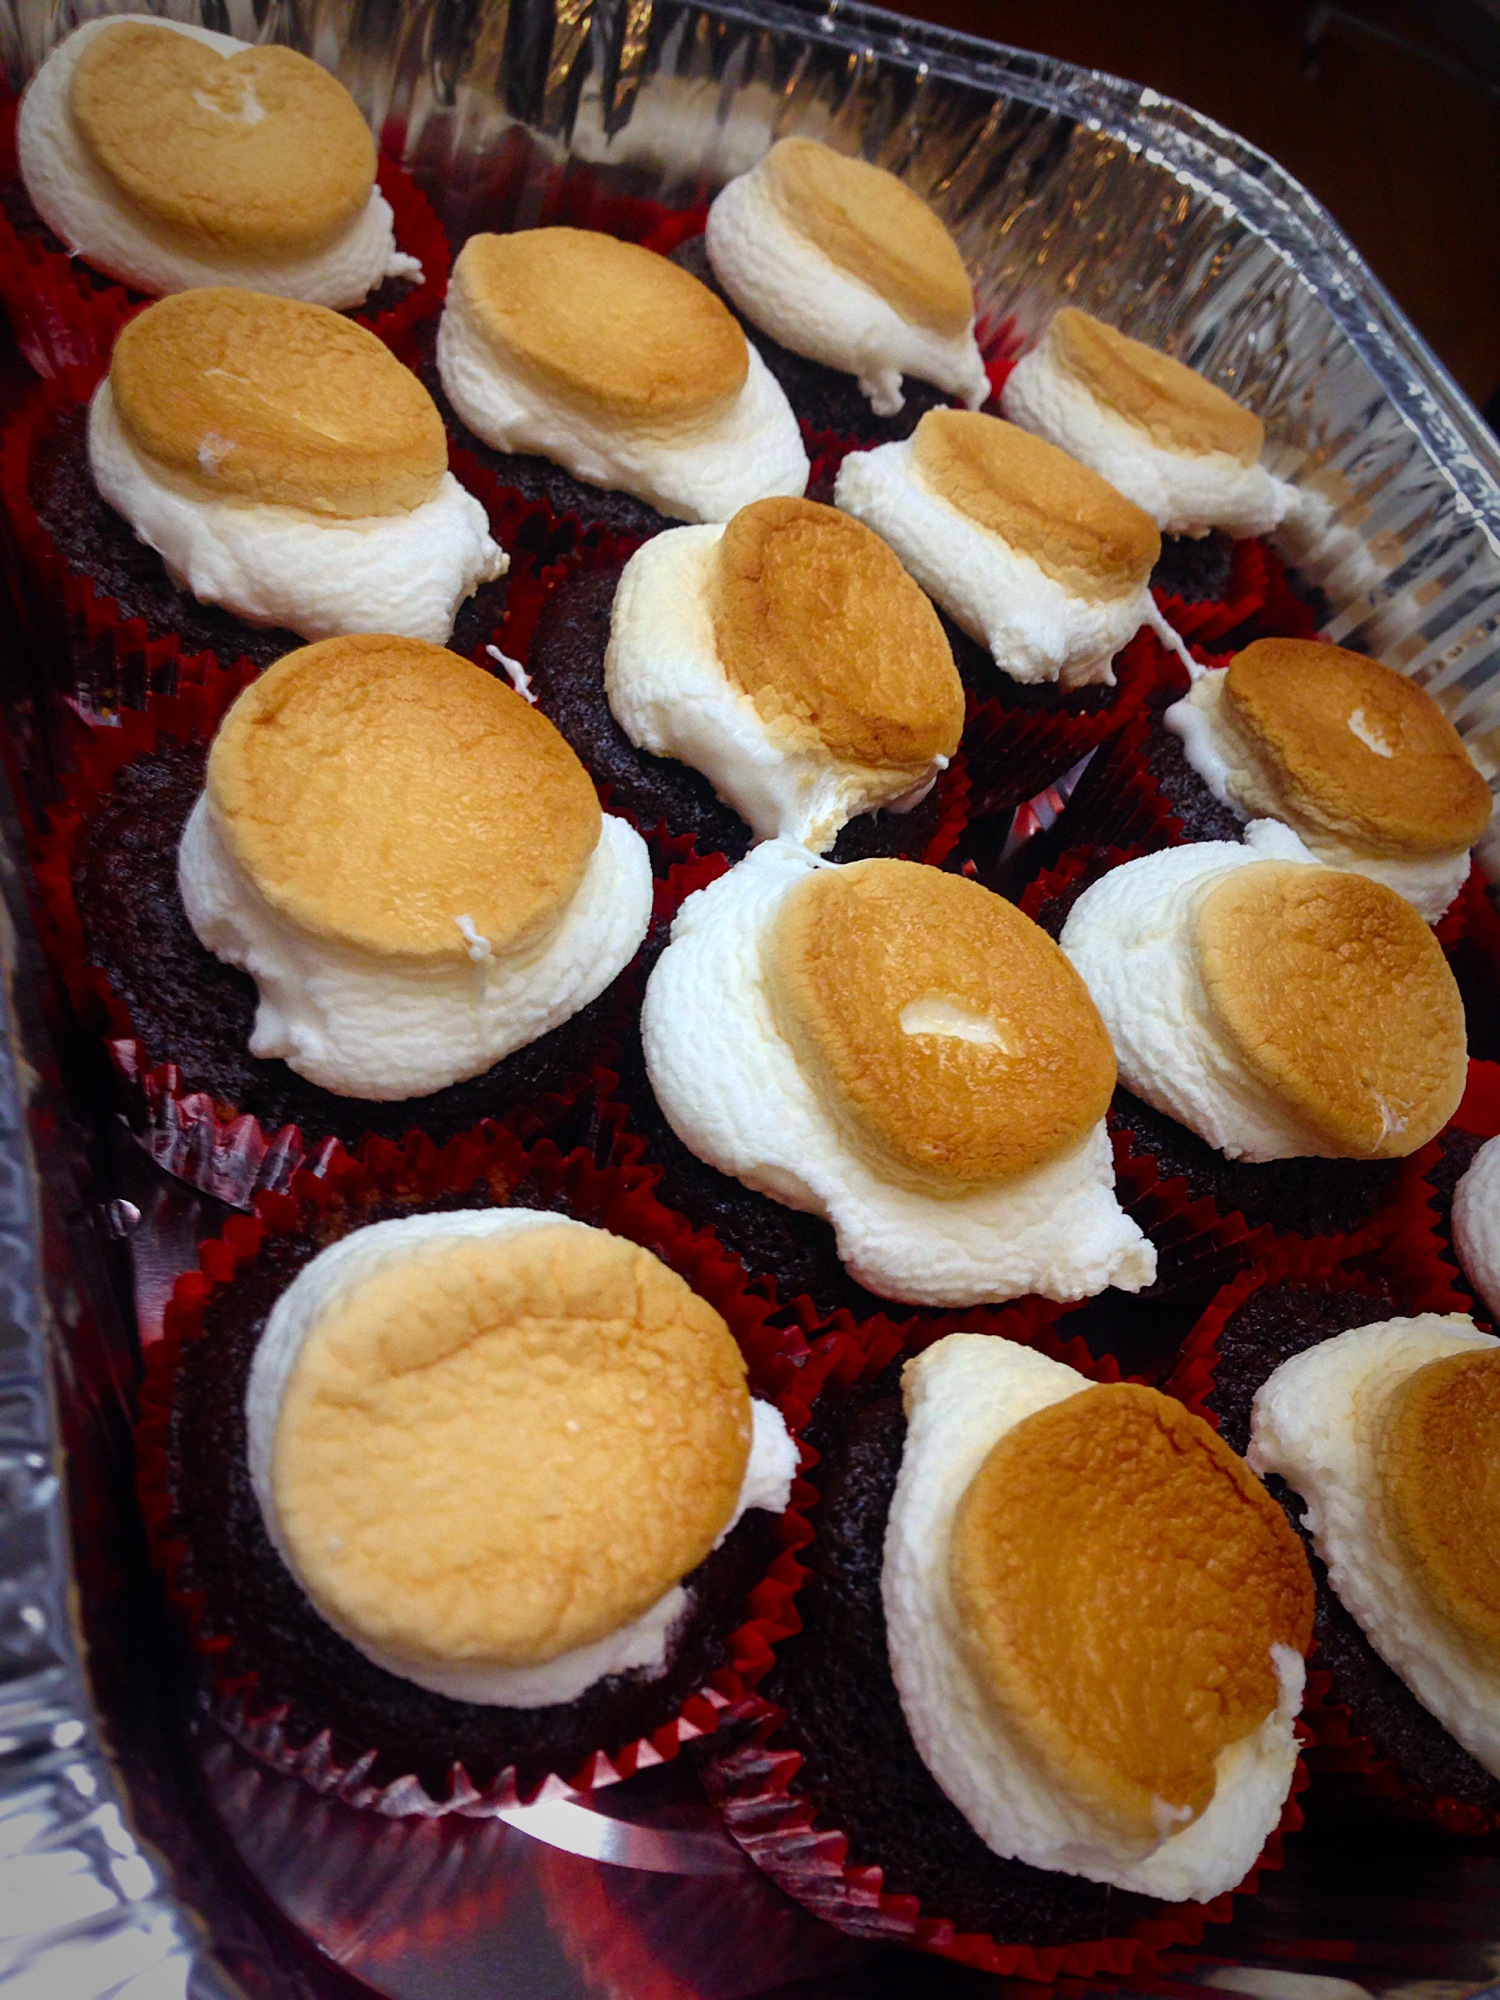
S’mores Cupcakes (adapted from iambaker.net)
Recipe makes 3 dozen cupcakes

Ingredients:

Chocolate Cupcake:

  • 1 3/4 cups all-purpose flour
  • 1 3/4 cups sugar
  • 3/4 cups good unsweetened cocoa powder
  • 2 teaspoons baking soda
  • 1 teaspoon baking powder
  • 1 teaspoon salt
  • 1 cup buttermilk
  • 100 grams of unsalted butter (melted)
  • 2 large eggs (room temperature)
  • 2 teaspoons pure vanilla extract
  • 3/4 cup instant coffee
  • 1 cup dark chocolate, chopped
Cookie Crust (because it is so difficult to find graham crackers in Hong Kong!!)
  • 1 1/2 cup crushed vanilla/honey cookies (use graham crackers if you want the original flavour!)
  • 70 grams unsalted butter (melted)
  • 36 large marshmallows (just get the large bags since you will be munching them while you make these!)

Instructions:

  1. Sift the flour, sugar, cocoa, baking soda, baking powder, and salt into the bowl and mix until combined.
  2. In another bowl, combine the buttermilk, melted butter, eggs, and vanilla.
  3. With the mixer on low speed, slowly add the wet ingredients to the dry including the coffee.
  4. Fold in finely chopped chocolate.
  5. Prepare cookie crust. Add melted butter to cookies and combine until moistened. Spread about 1 tablespoon of crumbs into bottom of cupcake liner. Press down flat (I used a metal spoon).
  6. Pour the batter  into the prepared cupcake pans (fill just 3/4 full) and bake for 18-20 minutes at 180 degree C i.e. 350 degrees F. Use toothpick test to make sure it’s well cooked.
  7. Transfer onto cooling rack.
  8. Line the marshmallows on a parchment lined cookie sheet and place in the over for 1 -2 minutes, or until the marshmallows start to puff up and turn brown – don’t walk away, keep your eyes on them!
  9. Remove from oven and  slide a spatula under the marshmallow and set on cupcake. Press gently to flatten.
  10. Obvs best served warm on the spot but I covered these bad boys with tin foil at room temperature overnight and brought them to work the next day and they still looked and tasted amazing!

IMG_2996

Enjoy!

IMG_2994

Baby Shower – Vanilla Cupcakes with a Strawberry Slap

photo

Today’s been a heck of a productive Saturday!! Had an amazing night before watching Grease picnic-style in an outdoor cinema (loves!) and it was so much better than I thought. There were burger stands, popcorn and I even saw some cotton candy and we were seated comfortably with our bottles of wine. Blissful indeed. I feel like I get old school movies more…like the jokes, the romantic scenes as supposed to some newer movies….DEFOS a sign of aging. BLEH. ANYWAYS! I diverge again….long story short, had myself a tamed night (pat on the back) and woke up at 8am this morning to start my Saturday morning baking for one of my dearest friend’s baby shower. On the list was: bake the cakes, whip the frosting and make a batch of homemade buttercream fondant.

photo 3

Sigh – I wish these cupcakes had more of a pink in-your-face punch, but limited time and ran out of pink food colouring so had to improvise. Thank god I still had yellow left…hey it’s an asian baby so there we go. To slightly compensate for the lack of ‘pink’, I added a bit of strawberry flava-fav into this incredibly simple, fool-proof and delish vanilla cupcake recipe. Boom.

photo 2

Vanilla Cupcakes with a Strawberry Slap (recipe adapted from spoonful.com)
(recipe makes 24 cupcakes)

Ingredients:

  • 2-1/2 cups self-raising flour
  • 1-1/3 cups sugar
  • 1 cup skim milk
  • 3/4 cup vegetable oil
  • 4 eggs
  • 1 teaspoon vanilla
  • 2 teaspoons strawberry flavoured gelatin (dissolved in a bit of hot water)

Directions:

  1. Preheat oven to 160 degrees Celsius. Prep your cupcake tins with cupcake liners.
  2. In a large mixing bowl, eat the sugar and eggs together until slightly thickened, about 1 minute (ideally this should be done with an electric mixer unless you want to work those arms out).
  3. Add milk, oil, vanilla, strawberry gelatin (dissolved) and flour (sifted) to mixture and continue to beat for another minute or so, just until the batter is smooth and creamy. Don’t overbeat – just ensure everything’s well combined.
  4. Scoop batter into cupcake liners 3/4 full (as it will rise and you want a nice level surface for decorating).
  5. Bake in preheated oven for 30 minutes or until the tops are golden and the centre passes the toothpick poke test.
  6. Let cool before decorating.

Vanilla Buttercream Frosting (recipe adapted from foodnetwork.com)
(recipe makes enough to frost 24 cupcakes plus more for licking)

Ingredients:

  • 1-1/2 cups icing sugar
  • 1/2 cup butter (room temperature)
  • 1 teaspoon vanilla extract
  • 1 tablespoon whipping cream

Directions:

  1. In an electric mixer fitted with a whisk, mix together sugar and butter. Mix on low-speed until well blended and then increase speed to medium and beat for another 3 minutes.
  2. Add vanilla, cream and icing sugar (sifted) and continue to beat on medium speed for 1 minute more. You can continue to add more milk to achieve desired consistency.

Simple Homemade Buttercream Fondant (recipe from allrecipes.com)
(Recipe makes a decent sized batch of fondant so depends how crazy you want to go with the decorations and you can always save it for next time)

Ingredients:

  • 1/2 cup light corn syrup
  • 1/2 cup butter (room temperature)
  • 1/2 teaspoon vanilla extract
  • 1 pound icing sugar 
  • 1/4 teaspoon salt

Directions:

  1. In a large bowl (again, electric mixer recommended), stir together the butter and corn syrup.
  2. Mix in the salt and vanilla, then gradually mix in the icing sugar (sifted) until it becomes a stiff dough. If you are using a stand mixer, use the dough hook; otherwise, knead by hand. If the dough is sticky, knead in more icing sugar until it is smooth.
  3. Store in an airtight container at room temperature or in the fridge.
  4. To use, roll out on a clean surface that has been dusted with icing sugar. Drape over frosted chilled cakes or cut/mould/bend into whatever decorations you desire!

There you have it. Go wild!

photo 5

Monster Cupcakes

20131109-204606.jpg

It’s Halloween again and that means time for blood and all things gory. I was seriously planning to do some blood dripping cupcakes with knives and the works but after going through these suggestions with my soon-to-be-four-years-old niece, she settled for green and blue monsters. Only request? Teeth!

IMG_1273

As much as I love a good chocolate cake, I seem to be having WAY too much of that lately, though I’ve noted to myself next one I need to make with chocolate mint frosting. Recently had one for a friend’s bday from Seva and is was AMAZE BALLS. Loves.

IMG_1360

Back to topic. So, I went back to my tried-and-tested red velvet cake recipe but seriously with my new job and trying to also fit in my happy hours, yoga zen sessions as well as good ol’ family quality time, I’m all for altering recipes and just making them as simple as ever. My alterations below for a revised, super buttery, moist and irresistibly easy cake recipe:

Red Velvet Cupcakes
Makes 30 – 40 cupcakes depending on the size

Ingredients:

  • 1 cup margarine (you can substitute with butter or shortening)
  • 2 large eggs
  • 1-1/2 cups sugar
  • 2 teaspoons cocoa powder
  • 1/2 ounce red gel icing coloring (or 2 ounces red water-based food coloring as per original recipe)
  • 2-1/2 cups cake flour
  • 1 cup 2% milk with 1 tablespoon vinegar (original recipe called for 1 cup buttermilk but it’s not something staple I have in my pantry!)
  • 2 teaspoons vanilla extract
  • 3 tablespoons baking powder (original recipe called for 1 teaspoon baking soda + 1 teaspoon vinegar. I realized at the last minute that I was out of baking soda! So I did the sub and omitted the extra vinegar below in the recipe with this substitution- it still came out great!)

Directions:

  1. Preheat oven to 350 degrees F.
  2. In the bowl of a mixer, cream together the margarine, eggs and sugar.
  3. In a separate small bowl, mix together the cocoa and food coloring. Add the paste to the margarine mixture.
  4. Sift the flour and salt into the mixture. Start the mixer to blend and slowly add in the milk & vinegar/ buttermilk mixture. Then add the vanilla extract and baking powder.
  5. Pour the batter into 2 greased 9-inch cake pans. Bake for 30 minutes or until an inserted cake tester comes out clean. Let cool on a cooling rack. Invert the cakes from the pans.

IMG_1269IMG_1270

 I made these monsters out of ready-made fondant and just added gel food colouring for the shades of greens, blues and yellows. Piped on some buttercream frosting onto the cooled cupcakes and stuck these toppers on! Run wild with your imagination – we sure did!
IMG_1341

Countdown to Christmas…..teeheehee

I just couldn’t help myself. Christmas songs everywhere and I’m loving it!! Even taking a peepee break in the mall washrooms with festive songs has been making me smile 🙂 The Vancouver rain? Not even complaining right now- it’s CHRISTMAS for god’s sake! Seriously time to do some shopping, drink some egg nog (spiked of course) and build em’ gingerbread houses.

I feel like I’m getting a bit…hmmm….well…let’s just say nowadays I much rather curl up warm under a fleece blanket, with a cup of vanilla chai latte, watching Storage Wars. Or the Next Iron Chef. And most recently? Live here, Buy That. Ahhh…love vicariously living through adventurous people while safely at home. Ok. That last part made me sound like a hermit but…well…you know what I mean I hope!

Anyways, that’s why I got excited @ Games Night + Potluck/ BYOB hosted by my friend, Monica. She is seriouslyhands-down, the best host. Her Toby is the friendliest, Caesar Milan-watching dog I’ve ever seen! Surprised the fiancé as it has been awhile since a dog has not pee-ed or attacked him (true story). Old school jello shots, ribs, lasagna, homemade sugar-glazed walnuts, bruschetta + cupcakes = best way to spend a Saturday night 🙂

And oh yes. Of course I brought cupcakes and of course they are slapped silly with Christmas love ♥ I wished I took more pics of the cupcakes but it was me with a bottle of wine and cakes. Just couldn’t focus!!

I made Red Velvet Cupcakes (I halved my recipe here from my previous post for a good batch of 14 cupcakes). And Christmas isn’t Christmas without green….

Key Lime Cupcakes (adapted from www.food.com)
Original recipe states 12 cupcakes but I was able to make 14 – 16 cupcakes

Ingredients:
– 1 3/4 cup all-purpose flour
– 1 teaspoon baking powder
– 1/4 teaspoon salt
– 2 cups unsalted butter, room temperature
– 1 1/4 cups sugar
– 2 large eggs
– 2 1/2 tablespoons fresh lime juice
– 1 tablespoon finely grated lime peel
– 1/4 teaspoon green food colouring
– 3/4 cup of almond milk + 1 tablespoon vinegar (my own substitute for 3/4 cup buttermilk since I never have that in my fridge! You can use this combo with almond milk, regular milk, soy milk, rice milk, etc.)

Directions:
1. Preheat oven to 350 degrees. Line a standard muffin pan with cupcake liners.
2. Beat butter in a large mixing bowl until smooth.
3. Add sugar and beat until blended.
4. Add in eggs one at a time.
5. Then add in lime juice, lime peel and food colouring.
6. Sift in flour and alternate with milk mixture (or buttermilk). Tip: If you are using an electric mixer, you can just add in flour and milk mixture at one and mix at low (2) speed.
7. Spoon batter into cupcake liners. Around 2/3 full is good.
8 . Bake cupcakes for 20 – 25 minutes. Do toothpick test to ensure it’s fully cooked. Original recipe says to cool for 10 minutes before removing from pan but I like to immediately remove from pan to let cool so that the cupcakes don’t overcook in the heated pan.
9. Make sure it is fully cooled before you frost them!
*You can always make these a couple days in advance and wrap them in an airtight container and freeze them. Just let them defrost before you frost.

Assembly:
1. While these babies were cooling, I started on my marshmallow fondant. I made a batch of white and kneaded in the food colouring as I went along.
2. I used round cookie cutters for the toppers and a flower cutter for the “snowflake”. For Rudolph, I used a smaller round cutter for the face and an even smaller one for the eyes and nose. The ears were from the same flower cutter but I just cut it in half and nipped out one petal to shape it into an antler-like thing 🙂 The eyeballs are just black fondant rolled balls.
3.  You can do all these pieces separately. When ready to assemble Rudolph, just tip water onto the pieces to stick them together. You can also do these in advance and let them air dry overnight.
4. Prepare your buttercream frosting (I used 1/2 the recipe which was sufficient to lightly frost around 30 cupcakes). Spread a layer on the top (you may even want to trim the cupcakes which an high dome top so that it is flat enough for the fondant topper to sit on) and place the topper on.
5. NOM NOM NOM

♥ Cake Smash! Gots to Love Em’ Giant Cupcakes ♥

Image

I’m always waiting for special occasions to get back into the kitchen to bake especially for my dear friend’s most adorable baby girl ♥ Thanks Angela & Maddy for the preview pics!

Since it was for her cake smash photo session, we went with a giant pink and white cupcake to match her outfit and it was an amazing challenge for myself as well just to do something a bit different from the usual cakes! Everytime I finish frosting the cake to prepare it for decorations to come, I get a bit excited. I just absolutely love decorating cakes! With a glass of wine would be the cherry on top 😉

Image

I found this brilliant giant cupcake mould that I just couldn’t resist and after a bit of researching online, I decided that a chocolate mould as the cupcake liner would be prettiest for this cake. I started to melt some white chocolate (note: I wanted to find some cute pink candy melts but it was not avail!! And when I got home and realized water-based food coloring is a no-go for coloring melted chocolate, I had no choice but to go au natural! Seems powdered-based food coloring hits the spot for melted chocolate).

Image

Next, I did a series of hit-and-miss roses and carefully placed them onto the cake with scissors, one at a time- must check out this video for those of you who wanna give this a go, it’s AMAZING!! It did take me a while but I think I got the hang of it after several hours!!

Image

So here’s a step-by-step for my creation (Instructions from CakeCentral.com):

Giant Pink Roses Cupcake

Directions:
1. Bake a cake! I made this basic vanilla cake and you can pretty much use any kind of cake recipe. Pour batter into the giant cupcake pan and I baked for around 50 – 55 minutes at 350 degrees celsius. Both the top and bottom came out perfect at the same time! Be sure to grease the pan and for added safety measure, you can line the bottom of the base part with parchment paper.

Image

2. Make your cupcake liner while your cake cools! Always make sure your cake is completely cooled before you frost it for best results. Once out of oven, let it cool in the pan for 15 minutes, then take it out and rest on cooling rack for around 30 minutes or so.

Image

Cupcake Chocolate Liner: 
Ingredients:
– Candy melts/ Chocolate chunks or chips
– Giant cupcake pan
– Spatula (or just your fingers!)
Directions:
1. Melt 1/4 a bag of candy melts/ chocolates
2. ‘Paint’ a thin layer of chocolate into the cake tin base (I went with the finger method)
3. Ensure you get the chocolate into all the grooves and you can drop the pan an inch or so down a couple of times to make sure you don’t have any air bubbles.
4. Put it in the fridge to set for at least half an hour.
5. Melt the rest of the bag of candy melts/ chocolates (you may also keep a little aside to attach the cake to the cake board).
6. Remove the tin from the fridge and ‘paint’ the rest of the melted chocolate in the tin. You can use a silicone spatula for ease or fingers work well as well! you can also hold the tin and rotate it around to evenly coat but just make sure you do this in a speedy manner to ensure the chocolate won’t set before you’re done! Push firmly to ensure you don’t get any airbubbles again.
7. Return pan to the fridge for at least 1 hour to set properly.

3. TIME for preparing the cake! Carve the bottom of the giant cupcake so that it doesn’t have any grooves left and is slightly smaller so that it will fit properly into the chocolate shell. Cut in half and add buttercream (I used my vanilla buttercream recipe) to the middle of the cake. Then stack both halves back together and frost the entire cake with buttercream.

4. Put the cake in the fridge for half an hour for the icing to harden and set.

5. When the chocolate shell has set in the fridge for an hour, take it out and hold the shell on each side with your fingers, add a little pressure pushing against the chocolate and pan and pull up (you will hear a little crack/pop sound as it comes loose) if this doesn’t happen put it back in the fridge to set longer. Note: I read that some people have a hard time getting it out after chilling the shell in the fridge for a long time and in this case, you might want to let it rest in room temperature to soften for 5 minutes or so before trying to pop it out again.

6. Get you iced cake out of the fridge and picking it up gently, drop it into the chocolate shell.

7. Next comes the top part of the cupcake! I found this video highly helpful! You hold onto the tip part and add buttercream onto the bottom as well as covering the edges around it to ensure you cover the entire cake. Then pop it onto the bottom cake.

8. Then be creative! You can pipe around the cake and add buttercream roses or you can do ruffles, or decorate with marshmallows, or edible glitter- there are so many ideas for a giant cupcake creation!

Image

ENJOY!!!

Image

Congratulations C&J!! Project Wedding Cupcakes: Chocolate & Vanilla Coconut Bliss

Image

Project #2: Wedding Cupcakes!

So, if you’ve been following, I’ve said YES to baking some cupcakes for my sister’s wedding…so we’re talking around 90 – 100 cupcakes total and I couldn’t be happier to do so! Since her favorite flavor is all things choco, I’ve decided to go with half half along with traditional vanilla. I used simple cake mix due to the time limit and quantity so that I can save more time for the decorating bit (unfortunately..not that it’s anything bad but I always prefer to bake things from scratch!). I found these super cute pink striped cupcake liners from Martha Stewart and knew I had to keep the frosting simple and elegant in order to keep to a clean wedding theme.

Image

I made MANY times the vanilla buttercream recipe and added around 6 drops of green food coloring to achieve a pastel sea-foamy green which was the main theme color of the wedding.

Image

Using a star-shape head, I piped out little flowers resembling small bouquets around the cupcakes and building up to the middle to create a peak. Then to keep to a simple theme, I sprinkled on some shredded coconut to put it off. A short trip to Michaels Craft Store and I found myself coming out with an adorably sweet wedding cake topper that I used for the top of the cupcake stand.

Image

ImageJ

Although some cupcakes were ruined during the delivery stage, I’m so happy to have been able to (semi) pull this off and I can’t wait to do more projects like these!

Image